How to set up programmatic demand (OpenRTB)
This guide shows you how to set up your own OpenRTB implementation in AdButler. You will learn:
- The purpose of OpenRTB.
- How to add a demand source.
- How to add a demand endpoint.
- How to configure zones for OpenRTB.
- How to assign endpoints to or exclude them from zones.
What is OpenRTB?
OpenRTB (Real Time Bidding) allows an impression to be auctioned off to the highest bidder in real time, as opposed to the traditional waterfall method where impressions are sent to exchanges one at a time.
With the waterfall method, impressions are offered to the next exchange in the stack only if the previous exchange didn't meet the publisher's minimum price. This means the winning bidder won't necessarily be the one with the highest offer. But RTB lets publishers contact multiple exchanges at once and give the impression to the highest bidder. OpenRTB is the established protocol for RTB.
Building your own OpenRTB implementation can be very time-consuming. But with AdButler, you can easily add OpenRTB 2.3 and 2.5 endpoints from exchanges, include or exclude demand partners from your inventory, and track programmatic statistics.
How to add a demand source
- Click on Programmatic in the left navigation menu to go to the Programmatic section.
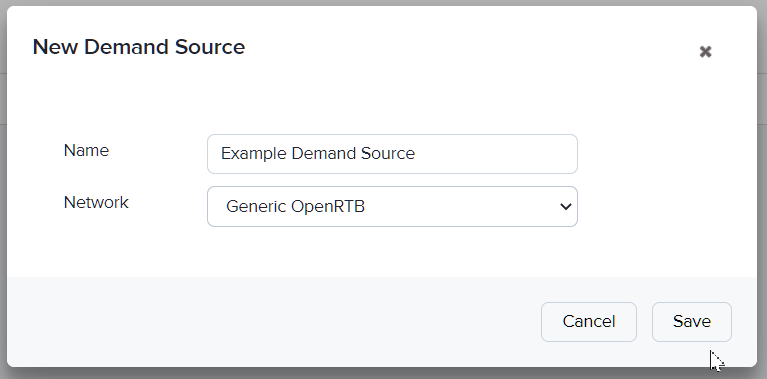
- Click Add New under the Demand Sources table. The New Demand Source window will appear.

- Name your demand source then choose your demand partner in the dropdown menu. If your demand partner is not on the list but they support OpenRTB 2.3 or 2.5, select Generic OpenRTB.
- Click Save. The newly created demand source will be added to the table. You can now add the endpoint for this demand source.
How to add a demand endpoint
Before following these steps, check the sizes and types of the zones to which you want to assign the endpoint. An endpoint's zone size and ad type parameters must match the parameters of the relevant zones. However, dynamic zones will match to any endpoint and will pass all endpoint sizes as valid ad sizes for the zone.
- Click on Programmatic in the left navigation menu to go to the Programmatic section.
- Click on the name of the relevant demand source in the table to go to its subsection.
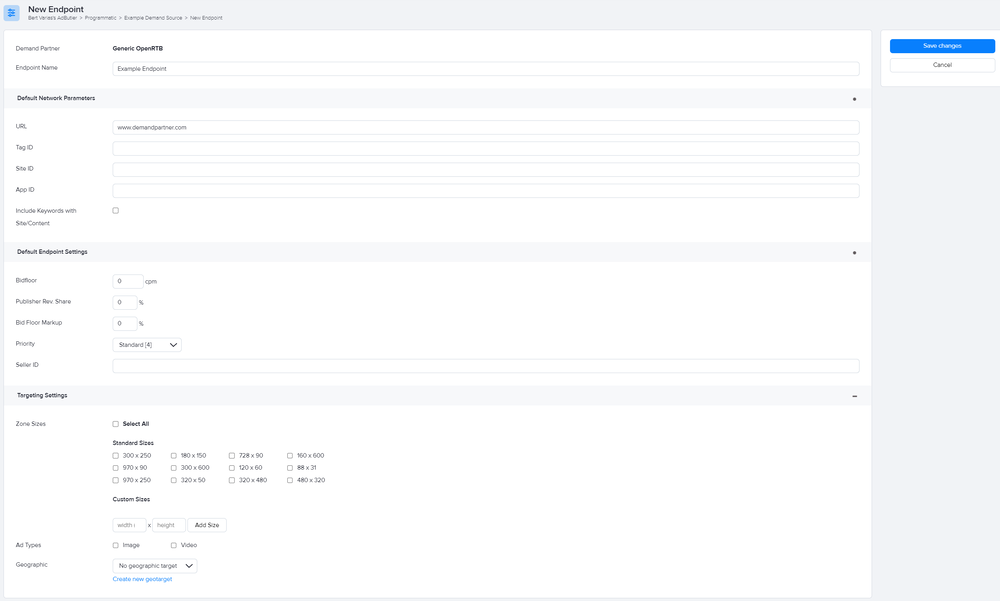
- Click Add New under the Endpoints table. The New Endpoint page will appear.

- Fill in the Default Network Parameters fields with the information that you obtained from your demand partner. The URL is mandatory, while the other fields may be optional depending on your setup.
window.abkw) or ad requests (kw), you can check the Include Keywords with Site/Content option to pass those keywords as the Site/Content object in OpenRTB requests.- Fill in the default endpoint and targeting settings as needed. For more information on creating geographic targets, read Geographic/location targeting.
- Click Save Changes on the upper right. The newly created endpoint will be added to the demand source's Endpoints table. You can now assign the endpoint to publisher zones.
Zone requirements for OpenRTB
Zones must match the dimensions and the ad type (either Standard or VAST) of the demand endpoint that you want to assign to them. You cannot change these parameters on existing zones, but you can create a new zone if necessary. However, dynamic zones will match to any endpoint and will pass all endpoint sizes as valid ad sizes for the zone.
Zones must be set to allow demand sources.
For Standard zones:
- Go to the relevant zone's section (Your AdButler > Publishers > Your Publisher > Your Standard Zone).
- Click on Programmatic Settings in the right menu. The Programmatic Settings window will appear.

- Click on the Enable Demand Sources switch to toggle it on.
- Click Save.
For VAST zones:
- Go to the relevant zone's section (Your AdButler > Publishers > Your Publisher > Your VAST Zone).
- Click on Edit Zone Properties in the right menu. The Edit Zone window will appear.

- Click on Allow demand endpoints to serve ads for this zone.
- Click Save.
Assigning or excluding demand endpoints
Before following these steps, check the sizes and types of the zones to which you want to assign the endpoint. An endpoint's zone size and ad type parameters must match the parameters of the relevant zones. However, dynamic zones will match to any endpoint and will pass all endpoint sizes as valid ad sizes for the zone. You can edit an endpoint's parameters by clicking Edit on the upper right of its subsection (see step 2).
- Go to the subsection of the relevant demand source (Your AdButler > Programmatic > Your Demand Source).
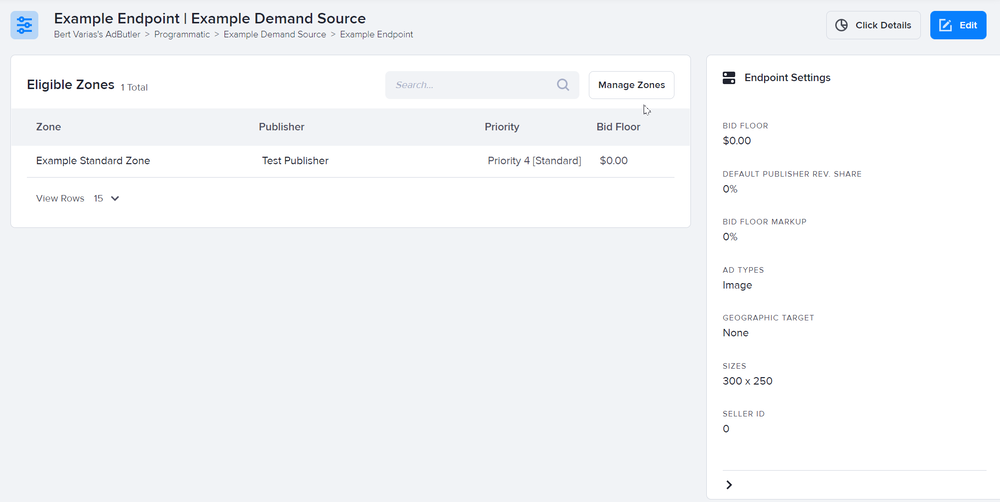
- Click on the name of the relevant endpoint in the table to go to its subsection.

- Click Manage Zones to open the zone assignment filters. This is where you can specify on which zones your demand partner is allowed or not allowed to bid. You can edit the inclusion and exclusion lists by clicking on their name then selecting which zones to include or exclude, respectively.
- Click Save on the upper right.
Your demand partner can now participate in real-time bidding on your specified zones, assuming the endpoint is active on their end. To find out how to view programmatic statistics, read Programmatic reports.